DIY Board and Batten Accent Wall
Board and batten detailing a charming aesthetic on the walls. It has been used in interior and exterior designs for many years, adding timeless appeal and interesting architectural elements to otherwise slow walls.
 View in gallery
  View in gallery
 DIY Board and Crossbar Wall
If you beloved the look of board and batten but are uncertain on its installation ins and outs, this DIY tutorial will walk you through the process, step by step.
 View in gallery
  View in gallery
 Make clean your walls thoroughly.
 View in gallery
 Remove any outlet covers.
 View in gallery
 Prime and paint the walls.
 View in gallery
 The crossbar in this instance will stretch from baseboard to batten molding installed only below the ceiling, and then paint was merely required up to an inch or two beneath the ceiling. Optional: Sand, prime and paint your boards and battens now. (Conditions and circumstances didn't permit my doing that at this point, although it is the highly recommended order of operation. Saves y'all time and effort in the long run.)
 View in gallery
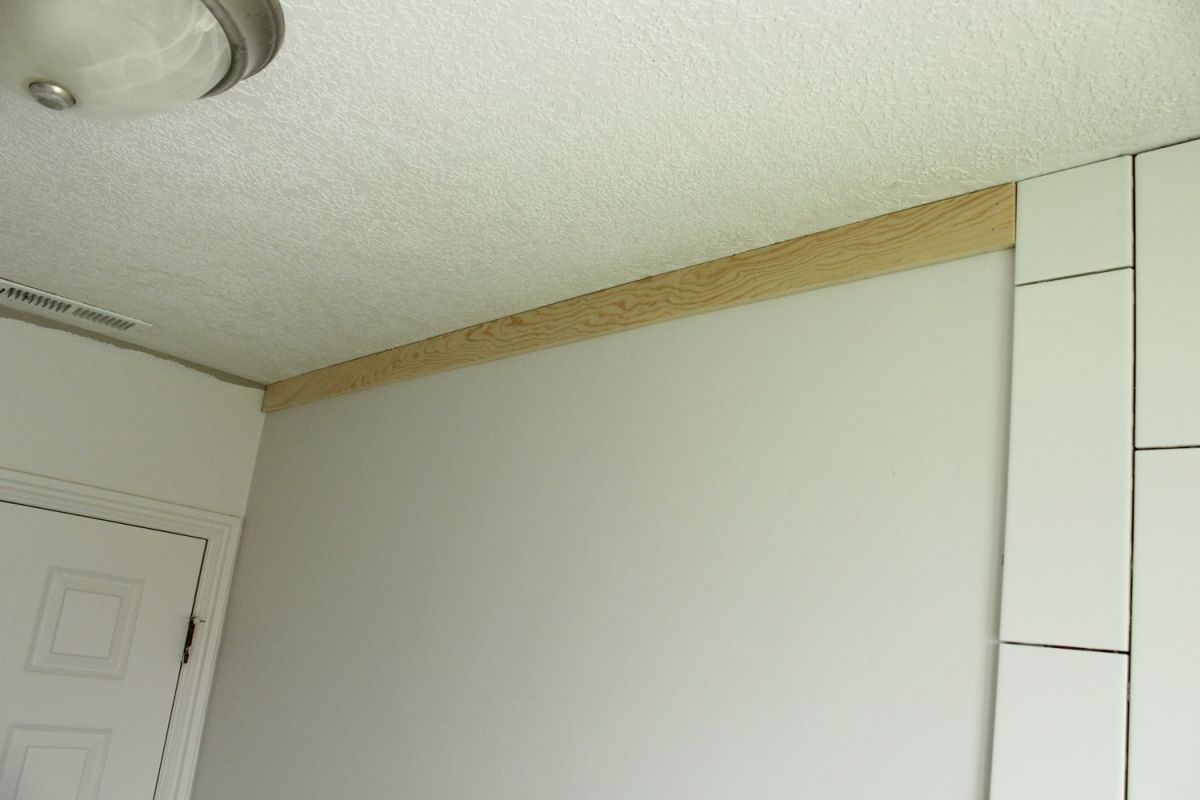
 When walls are thoroughly primed and painted, it's time to install the board, which is the horizontally running board. (The up-and-downwardly ones are the battens.)This tutorial uses ane/2″ thick i×4 boards for this part. Cull a wall to outset, and measure the distance for your board length.
 View in gallery
 Measure out and mark your lath.
 View in gallery
 Tip: When marking a board to cutting, avoid marking simply a line or a dot. Instead, brand a "V" marking, where the point of the 5 hits at your cutting line. This improves accuracy, as you know exactly where the cut intersection should exist. (Sometimes with pencil lines mark measurements, you're non sure which side of the pencil line is the virtually authentic.)
 View in gallery
 Chop your lath.
 View in gallery
 Utilise a level or, in this example, the ceiling, to keep the board lying perfectly horizontal across the face of your wall. Dry fit it to your space to brand sure it fits.
 View in gallery
 Before yous attach the board to the wall, use a stud finder to decide where your studs are. It'due south a good idea to, when possible, attach your boards to the studs.
 View in gallery
 Hold the board up with one mitt (or get a helper to practise it for you), then mark the stud spaces with the other. If y'all're flying solo similar I was, first mark the studs on the wall with an X, and so agree upwards the board in place and mark the studs on the side of the board itself. Since you've painted your walls already, and all.
 View in gallery
 Use a brad nailerto attach the board to the wall on the studs. I sunk about three nails at each stud surface area.
 View in gallery
 Repeat board installation on all walls around your room. If you're not installing your boards at ceiling height, proceed using a level and vertical measurements on all walls to ensure that you're not creeping upward or downwards as you go.
 View in gallery
 With the boards installed at whatsoever level yous've attached them (mine are at the ceiling), information technology's time to install the first batten. Mensurate your vertical distance, from the floor or the top of your baseboard (wherever the crossbar is touching the flooring) upward to the bottom edge of your board.
 View in gallery
 Cut your batten accordingly. In this bathroom, the batten adjacent to the tile are pieces of 1/two" alder that are thicker merely the aforementioned width (1-iii/viii") as the rest of the battens. This is due to the fact that the tile sticks out then far, and I wanted the batten to serve equally a sort of visual border to the tile. A i/iv″ batten, which is what was used everywhere else, would've exposed likewise much of the tile and looked a bit odd.
 View in gallery
 Install the crossbar with a brad nailer. Information technology's important to annotation that the vertical battens may or may non fall on stud lines…but probably they won't. Only nail them into place wherever they autumn, using brad nails that are long enough for the drywall. This example uses ane-one/four" brad nails.
 View in gallery
 Meet how nicely the thicker showtime batten sort of frames out the tile? It provides a nice transition into the remainder of the bathroom (or vice versa).
 View in gallery
 And considering it's the aforementioned width as the other battens, this discrepancy is hardly noticeable.
 View in gallery
 With your boards installed and your first batten in place, it's time to get-go installing the rest of the battens. If you haven't already decided how far apart you desire them, now is the time to do it.
 View in gallery
 You can simply measure the width of your wall and make a mathematical decision based on that measurement. Or you can apply a couple of spare bits and move them around until you get a altitude that yous like, that works proportionately in your space. This is a small room, so I wanted the distance between the battens to reverberate that. I too love the wait of original exterior battens, which tend to exist thinner and closer together than cottage-way battens in many interior designs.
 View in gallery
 After playing around with the distances, 10" was determined as the perfect distance. Make a marking at the bottom of your wall at this distance. Notation: Make sure, as you're mark, that you are measuring your space consistently. As in, don't measure a 10" gap in one section and and then 10" spaces from the 2 battens' right or left sides in another. Exist consistent.
 View in gallery
 Also measure the distance along the top of your batten, just nether the board.
 View in gallery
 With your ii x" (or any distance) spaces marked, it's time to measure the vertical length for your batten. Measure this now, direct at the markings y'all just fabricated to ensure true vertical.
 View in gallery
 For the majority of the battens (other than the two battens abutting the tub environment tiles), I used 1/four″ deep 1-iii/8" wide strips. I chose 1/4″ because I wanted a less intrusive (more visually subtle) crossbar look, and I also didn't desire to reinstall my baseboards, the elevation of which are nigh 1/4" deep.
 View in gallery
 Cutting your batten co-ordinate to your measurement, then align information technology to your marker. If the dry out fit is sound, brad nail the bottom into place.
 View in gallery
 Align the batten at the top, and brad blast it into place.
 View in gallery
 You should now have your second crossbar attached at just the meridian and bottom. Y'all'll need to attach along the center of your batten, too, only it'south a waste of time to measure every few inches to do this. Withal, you can't rely on the batten to lie perfectly straight, either.
 View in gallery
 To work efficiently and accurately, you lot'll want to create a width template for betwixt your battens. You can use this for every crossbar you lot identify from this point on. Carefully measure and marker a scrap piece of wood equaling the precise distance betwixt the bottom role of your battens. (Measure at the lesser function, because you measured this outright so will become a more authentic reading.)
 View in gallery
 Cut this chip wood and run a dry fit exam. It should fit snugly and perfectly between your two battens. If it doesn't, cut information technology again until information technology does. The success of your unabridged room'south batten beauty lies largely in the accurateness of this template guide.
 View in gallery
 Movement your template up between the battens, and brad nail the new batten into place. You might find yourself pushing the new batten in to the right, or pulling it out to the left slightly in club to go far fit. That's the whole point of the template – ensuring a perfect space between the two battens.
 View in gallery
 This photo shows a signal I had to push in the batten and nail it in.
 View in gallery
 You will end upwardly with two perfectly spaced battens. (Photo angle of this spacing makes them look a little bowed, but they are perfect in existent life.)
 View in gallery
 Proceed on in this fashion – nailing the bottom, top, and then centers – for each batten all forth this wall.
 View in gallery
 It's coming along! Nice work.
 View in gallery
 Continue on other walls equally yous tin.
 View in gallery
 Not every wall will exist perfectly straightforward. Y'all might run into some obstacles, such as outlets or lite switches. That was the case for this half-wall by the bathroom door. Your switch plates will probably still be removed from when yous painted; loosely put them back on. (You don't have to screw them on, though.)
 View in gallery
 At the place where the batten will fall (in this example, directly in a higher place the right light switch), mark with a pencil the top and bottom of your plate.
 View in gallery
 Remove the encompass.
 View in gallery
 Measure the distance of the 2 batten parts – from the lower edge of your board to the top marking, and from the lower marking down to the ending bespeak of your batten (in this example, a countertop).
 View in gallery
 Cutting those batten lengths carefully. Then spin your chop saw 45", lay your crossbar piece sideways, and cut off part of one end.
 View in gallery
 This will result in function of the end being angled. You lot want to leave enough of the crossbar end flat, though, so as to match up more than closely with the outlet or switch plate surface. This is only a little detail that will create a more professional-looking stop product.
 View in gallery
 Identify the batten pieces according to your measurements, and blast them into place.
 View in gallery
 Hither's a side view of what silhouette you're after. Run across how nicely the edges volition come up together with the switch plate, when it's reinstalled?
 View in gallery
 With all boards and battens installed, it'due south time to fill the brad boom holes. Grab some quick-drying, no-sanding-required spackling.
 View in gallery
 Use tiny bits on your finger to fill the brad nail holes.
 View in gallery
 If you lot add a lilliputian as well much spackling on accident, wipe away the backlog with your thumb. Remember, since you're not sanding (which is a huge fourth dimension-saver!), you lot want the finish to be perfectly polish on this step.
 View in gallery
 After all the brad nail holes are filled with spackling, information technology's time to caulk. You demand to caulk anywhere that board or batten meets another surface – ceiling, wall, baseboard, countertop, you go the idea. Run a sparse bead of caulk in your joints.
 View in gallery
 Moisten your finger a bit with some evidently erstwhile tap water.
 View in gallery
 Run your finger over the caulk bead, smoothing information technology into a squeamish grooved line.
 View in gallery
 The thought is not to cover the wall and batten with caulk; rather, the thought is to connect only the seam between the two so at that place'south no gap. The less caulk you utilise while achieving this, the meliorate.
 View in gallery
 Yous can see the subtle finishing touch that the caulk provides for the unabridged board and crossbar pattern.
 View in gallery
 Once your spackling and caulk have stale completely, it'southward fourth dimension to pigment. If y'all were able to paint your boards and battens earlier installing them, this is a relatively uncomplicated business of brushing paint over those spots. Otherwise, you'll be left to pigment everything you just installed. I recommend using a brush for all seams and then a foam roller over the shine surfaces to remove the castor strokes.
 View in gallery
 Congratulations! Finished.
 View in gallery
 Annotation: Despite the lighting discrepancies of these earlier and after photos, the boarded and battened walls are clearly a winner in the pattern department. No dull, apathetic walls, these. They are visually interesting while remaining understated, and they emphasize verticality in this very small bathroom. A winning wall design.
Source: https://www.homedit.com/board-and-batten/
0 Response to "DIY Board and Batten Accent Wall"
Post a Comment